There’s something undeniably magical about sinking your teeth into a Cornish pasty-the golden, flaky crust giving way to a hearty, savory filling that warms both body and soul. But behind that perfect bite lies an artful dance of ingredients and technique, where flour, fat, and water unite to create a crust that’s crisp yet tender, sturdy yet melt-in-your-mouth. Crafting the perfect flaky crust for Cornish pasties is more than just following a recipe; it’s about understanding texture, temperature, and timing to bring out the best in this beloved British classic. In this article, we’ll explore the secrets and science behind building that ideal pastry shell, so your pasties emerge from the oven with a golden glow and a satisfying crunch every single time.
Crafting the Perfect Flaky Crust for Cornish Pasties
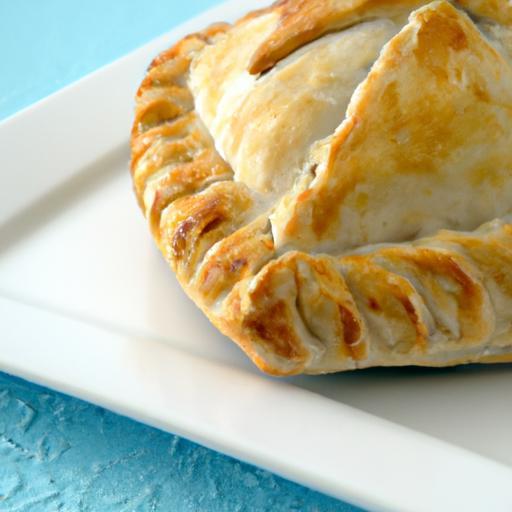
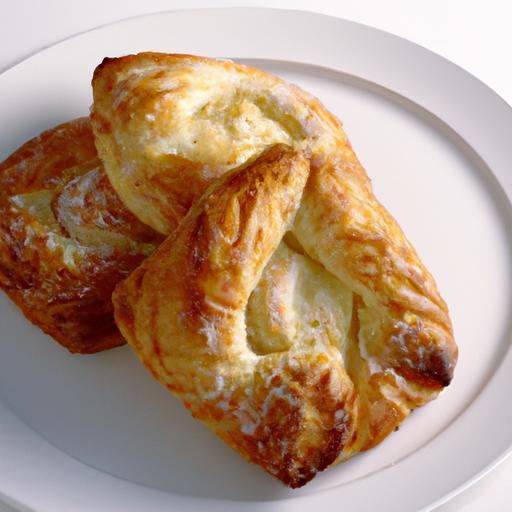
Crafting the perfect flaky crust for Cornish pasties is an art that unlocks the true soul of this beloved British classic. The glorious contrast of crisp, buttery layers that gently yield to the hearty filling beneath is what elevates a pasty from ordinary to extraordinary. Each bite reveals a symphony of textures: the delicate crunch of the outer shell leading to a soft, tender interior-a hallmark of masterful dough preparation and impeccable baking technique.
Rooted in Cornwall’s culinary heritage, the Cornish pasty was once the humble meal of miners and laborers, designed to be durable yet delightfully indulgent. But beyond tradition, understanding how to select the ideal flour and fats, mastering the dough, and perfecting baking conditions is essential for anyone eager to create that quintessential flaky crust.
Prep and Cook Time
- Preparation: 30 minutes
- Resting Dough: 1 hour
- Cooking: 45 minutes
- Total Time: 2 hours 15 minutes
Yield
Makes 6 generously sized Cornish pasties
Difficulty Level
Medium – perfect for adventurous bakers ready to hone their pie-making skills
Ingredients
- 2 cups all-purpose flour, sifted
- 1 cup plain (cake) flour for extra tenderness, sifted
- 1 tsp fine sea salt
- 150g (approx. 2/3 cup) unsalted cold butter, cubed
- 75g (approx. 1/3 cup) vegetable shortening or lard, cold
- ½ cup ice-cold water, plus extra if needed
- 1 tbsp white vinegar (optional – promotes gluten relaxation)
- 1 egg, beaten, for egg wash
Instructions
- Combine the flours and salt. Using a large bowl, whisk together the all-purpose and plain flours with sea salt until evenly blended-this mix yields a tender but sturdy dough.
- Incorporate cold fats. Add the cubed cold butter and vegetable shortening or lard to the flour. Using your fingertips or a pastry cutter, gently rub the fats into the flour until the mixture resembles coarse breadcrumbs with visible chunks of fat-these pockets of fat are crucial for flakiness.
- Add ice water and vinegar. Drizzle the ice-cold water and optional vinegar into the mixture gradually, folding the dough with a fork or your hands. Stop as soon as the dough just starts to come together; avoid overhydration to prevent a tough crust.
- Rest the dough. Form the dough into a flat disc, wrap it in cling film, and refrigerate for at least 1 hour. This resting period allows the gluten to relax and the fats to solidify, setting the stage for beautiful layers.
- Roll and fold for layering. On a lightly floured surface, gently roll out the dough to about ¼ inch thickness. Fold it into thirds like a letter, rotate 90 degrees, and repeat rolling and folding 2 to 3 times. This lamination technique traps fat in layers, building the signature flakiness.
- Shape and fill. Roll the dough out to approximately 6-7 inch circles. Spoon your prepared filling onto one half of each circle, then fold over and crimp the edges firmly to seal. Brush the tops with beaten egg.
- Bake carefully. Preheat your oven to 200°C (400°F). Place the pasties on a parchment-lined baking tray and bake in the middle rack for 40-45 minutes or until the crust is golden brown and visibly flaky. Avoid opening the oven early to maintain rising steam and crispness.
- Rest before serving. Let the pasties cool for at least 10 minutes on a wire rack. This ensures the layers set perfectly, and the crust retains its flaky texture when cut.
Tips for Success: Crafting the Perfect Flaky Crust for Cornish Pasties
- Flour selection: Combining all-purpose with plain (cake) flour strikes the perfect balance between gluten development and tenderness.
- Fats matter: Using a mix of butter and shortening or lard enhances both flavor and flakiness-pure butter is delicious but less stable; lard adds incredible layers.
- Cold ingredients: Keep all fats and liquids cold; warmth melts fats prematurely, resulting in a dense crust.
- Handling dough: Don’t overwork-gentle folding and resting are secrets to light layers.
- Resting time: At least 1 hour cold rest is non-negotiable to relax gluten and chill fats for lamination.
- Baking environment: Bake directly on a preheated baking stone or tray to encourage even, crisp browning.
- Make-ahead: Dough can be chilled for up to 24 hours or frozen, wrapped tightly, to improve convenience without losing quality.
Serving Suggestions
Serve your Cornish pasties warm alongside a crisp garden salad or steamed seasonal vegetables for a balanced meal. A dollop of tangy horseradish cream or a spoonful of wholegrain mustard complements the buttery crust and hearty filling beautifully. Garnish the plate with fresh thyme sprigs or finely chopped parsley to add a pop of color and herbaceous aroma, enhancing your presentation and appeal.
| Nutrient | Per Pasty |
|---|---|
| Calories | 420 kcal |
| Protein | 12 g |
| Carbohydrates | 48 g |
| Fat | 18 g |
For a deeper dive into all things pastry, check out our ultimate guide to pie crusts. To better understand the science behind flakiness and gluten development, Serious Eats offers an excellent primer on flour science.

Q&A
Q&A: Crafting the Perfect Flaky Crust for Cornish Pasties
Q1: What makes a Cornish pasty crust different from other pie crusts?
A: The Cornish pasty crust is uniquely designed to be sturdy yet tender, with a delicate flakiness that holds hearty fillings without sogginess. Unlike typical pie crusts that might prioritize buttery softness, a pasty crust balances strength and texture, creating that classic, satisfying bite.
Q2: Which flour is best for achieving the ideal flaky crust?
A: A soft wheat flour with moderate protein content-such as all-purpose flour-is ideal. It strikes that perfect middle ground: providing enough gluten for structure, yet light enough to create lovely flaky layers. Some bakers add a touch of bread flour to boost resilience, especially if handling wetter fillings.
Q3: How crucial is the fat choice in the crust?
A: Fat is the hero of flakiness! Traditional recipes call for butter or a mix of butter and lard. Butter brings rich flavor and a tender crumb, while lard contributes incredible flakiness and strength. Combining the two often results in a crust that’s both delicious and delectably layered.
Q4: What’s the secret technique for layering fat and flour?
A: Temperature and minimal handling are key. Keep ingredients cold to prevent fat from melting prematurely. Use a quick cutting-in method, leaving visible fat pieces in the dough. These pockets melt during baking, creating steam that separates the flour layers-voilà, flakiness!
Q5: Should the dough be rested before rolling?
A: Absolutely. Resting the dough in the fridge for at least 30 minutes relaxes gluten strands, preventing toughness, and keeps the fat chilled for optimal flake formation. Patience here rewards you with a tender, buttery crust that bakes to golden perfection.
Q6: How thick should the pasty crust be rolled out?
A: Aim for about 3-4 millimeters (~1/8 inch). Too thin, and it risks breaking or leaking; too thick, and it becomes doughy and masks the filling. This sweet spot ensures a crust that’s crisp, flaky, and just substantial enough to hold the hearty Cornish filling.
Q7: Any tips for sealing the pasty without losing flakiness?
A: Use cold water sparingly to moisten edges for sealing, then crimp firmly but gently. Avoid overworking the dough at the seal to maintain those flaky layers. Traditionally, the thick crimp is not just for show-it’s a handle and a structural safeguard that keeps juices locked inside.
Q8: Can the flaky crust be made ahead of time?
A: Yes! You can prepare the dough in advance, wrap it tightly, and chill for up to 2 days-or freeze for up to a month. Thaw slowly in the fridge before rolling out. This makes it easier to manage your baking schedule without compromising the crust’s flaky integrity.
Q9: What’s the baking secret to achieving that perfect golden crust?
A: Bake at a high temperature (around 200°C/400°F) to set the crust and develop crisp layers quickly. An egg wash before baking adds alluring color and shine. To maintain flakiness, avoid opening the oven door unnecessarily to keep the heat steady.
Q10: Any creative twists to personalize a Cornish pasty crust without losing its soul?
A: Experiment with infusing the dough with herbs like thyme or rosemary, or introducing a touch of cheese or wholegrain flour for added flavor and texture. Just remember, the cornerstone of a great pasty is that classic flaky, buttery crust-so keep tweaks subtle to honor tradition while adding your signature flair.
Closing Remarks
Mastering the art of the perfect flaky crust for Cornish pasties is more than just a baking skill-it’s a gateway to culinary tradition wrapped in tender, buttery layers. With each fold and pinch, you’re not only creating a golden, crisp embrace for your savory filling but also honoring a time-honored heritage. So next time you roll out your dough, remember: patience, precision, and the right touch of butter are your best allies. Embrace the journey, savor the process, and enjoy every flaky, flavorful bite of your homemade masterpiece. Happy baking!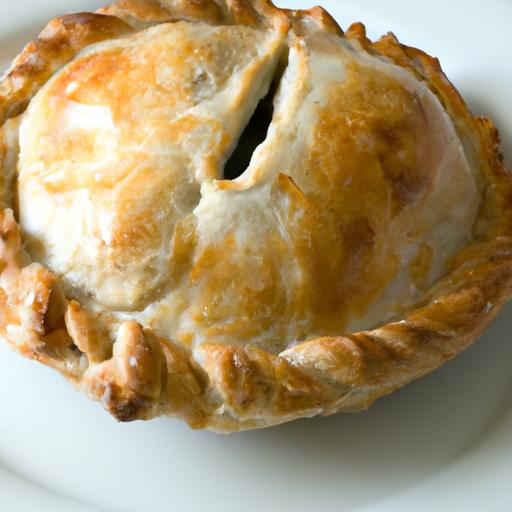


